
We are living in times when anything and everything is available on the internet. The internet comprises of billions of websites, applications, and social media pages. Although mobile apps are becoming increasingly popular with the rise in smartphone use, it cannot be denied that websites continue to remain an integral part of the World Wide Web.
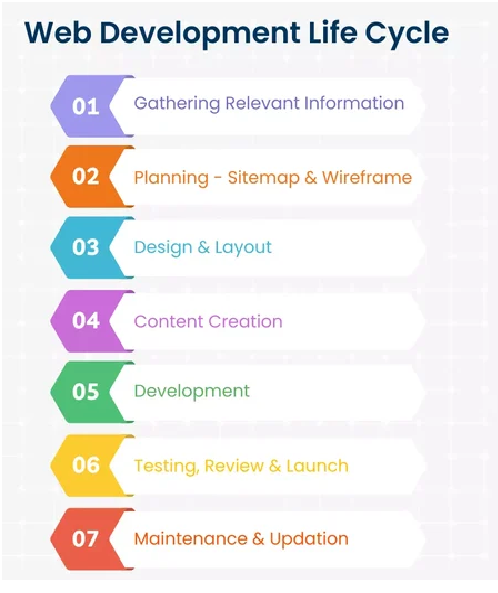
When it comes to developing a website, having a structured approach is crucial to ensure the success of your project. A well-defined checklist can help you stay organised, meet deadlines, and deliver a high-quality product. This article outlines a comprehensive web development project checklist with 12 unique steps to guide you through the process. Before delving into the details of a web development project, let us share some statistics that highlight the rapid evolution of web development globally and explain why a website remains crucial for a brand.
|
SL NO. |
Factors affecting the evolution of a website development |
Statistics to prove |
|
1. |
Global users | Currently there are almost 5.50 billion internet users in the world. (Statista) |
|
2. |
Web design | 94% of people say bad design is the main reason they don’t trust certain websites. (Social Media Today) |
|
3. |
WordPress | WordPress accounts for 42.2% of all websites. (W3Techs) |
|
4. |
Web development | Over 380 new websites are created every minute. (Siteefy) |
|
5. |
Website load speed | Websites that load slowly lead to a $2.6 billion loss in revenue every year. (Web Fx) |
|
6. |
Mobile first development | In 2022, 68% of the companies that developed a mobile-first website saw a rise in sales. (SAG IPL) |
|
7. |
Responsiveness | 73.1% of web designers believe that a non-responsive design is a top reason visitors leave a website. (GoodFirms) |
|
8. |
Embedding video on a web page | Pages with videos keep users on them for 88% longer than pages without. (Web Fx) |
Also Read: E-commerce Website Development: Must-Have Features for Conversions
The first step of any successful web development project lies in clearly defined goals and objectives. Without a clear direction, your project will face numerous issues during development.
Importance of clear goals: Clear goals provide a roadmap for your project, helping you stay on track and measure progress. They ensure everyone understands the project’s purpose and what needs to be achieved. Clear goals also help prioritise tasks and make informed decisions throughout the project lifecycle.
Setting SMART objectives: SMART objectives are Specific, Measurable, Achievable, Relevant, and Time-bound. For example, instead of saying “increase website traffic,” a SMART objective would be “increase website traffic by 20% within six months.” This approach ensures that your objectives are clear and attainable, offering a guideline for your project.
Aligning goals with business needs: Ensure your project goals align with your objectives. This ensures that the project is focused on the success of your organisation. For instance, if your business goal is to increase online sales, your web development project should focus on creating a user-friendly e-commerce platform.
Understanding your target audience and market is essential for creating a website that meets user needs and stands out from the competition.
Understanding your target audience: Identify your users, their preferences, and their pain points. This information will guide your design and content decisions. Conduct surveys, interviews, and focus groups to gather insights about your audience. Use tools like Google Analytics to analyse user behaviour on your current website.
Analysing competitors: Study your competitors’ websites to understand what works and what doesn’t. Look for gaps in their offerings that you can fill. Analyse their design, content, functionality, and user experience. Identify their strengths and weaknesses to create your strategy.
Identifying market trends and opportunities: Stay updated on the latest trends in web design and development. This will help you add innovative features and stay ahead of the curve. Follow industry blogs, attend conferences, and participate in online forums to stay updated on new developments.
A skilled and professional team is crucial for the success of your web development project.
Roles and responsibilities: Clearly define each team member’s roles and responsibilities. This includes developers, designers, project managers, and content creators. Ensure that everyone understands their tasks and how they contribute to the project.
Finding the right talent: Hire individuals with the right skills and experience for your project. Consider their ability to work collaboratively and adapt to changes. Look for team members who are technically proficient and have good communication and problem-solving skills.
Importance of team collaboration: Foster a collaborative environment where team members can freely share ideas and provide constructive feedback. Effective communication and teamwork are key to overcoming challenges and achieving project goals. Collaboration tools like Slack, Trello, or Asana can be used to ensure better communication and project management.

A detailed project plan is a blueprint for your web development project, outlining the steps needed to achieve your goals.
Breaking down the project into phases: Divide the project into phases, such as planning, design, development, testing, and deployment. This makes it easier to track progress and address issues as they arise. Each phase should have specific deliverables and milestones.
Setting deadlines: Establish milestones and deadlines for each phase of the project. This helps ensure the project stays on schedule and team members take responsibility for their tasks. Use Gantt charts or project management software to visualise the timeline and track progress.
Resource allocation and budgeting: Allocate resources, including time, money, and personnel, to each phase of the project. Create a budget with all expenses, including unexpected costs. Review and adjust the budget regularly to avoid overspending.
A positive user experience is critical to the success of your website. UX design focuses on creating a website that is easy to use, visually appealing, and meets user needs.
Importance of UX design: A well-designed UX can increase user satisfaction, engagement, and conversion rates. It can also reduce bounce rates and improve overall website performance. Good UX design considers the user’s journey and aims to make it as smooth and enjoyable as possible.
Conducting user research and creating personas: Conduct user research to understand your audience’s needs, behaviours, and preferences. Create user personas to represent different segments of your audience and guide your design decisions. Use tools like surveys, interviews, and usability testing to gather insights.
Wireframing and prototyping: Create wireframes and prototypes to visualise your website’s layout and functionality. This allows you to test and refine your design before development begins. Use tools like Sketch, Figma, or Adobe XD to create interactive prototypes and collect feedback from stakeholders and users.
Also read: How to Choose the Right Custom Ecommerce Website Design
The technical architecture of your website determines its performance, scalability, and security.
Choosing the right technology stack: Select the right technology stack for your project, including programming languages, frameworks, and tools. Consider factors such as performance, scalability, and ease of maintenance. Popular technology stacks include MEAN (MongoDB, Express.js, Angular, Node.js) and LAMP (Linux, Apache, MySQL, PHP).
Planning the backend and frontend architecture: Design the backend architecture to handle data storage, processing, and security. Plan the frontend architecture to ensure a seamless user experience. Ensure that both architectures are well-integrated and can communicate effectively.
Ensuring scalability and security: Build your website with scalability in mind to handle higher traffic and data as your business grows. Implement security measures to protect user data and prevent cyberattacks. Use load balancing, caching, and database optimisation to improve performance.
Effective version control and a well-configured development environment are crucial for managing code and collaborating with your team.
Importance of version control systems: Version control systems track changes to your code, allowing you to revert to previous versions if needed. They also facilitate collaboration by enabling multiple developers to work on the same codebase. Use platforms like GitHub, GitLab, or Bitbucket to manage your repositories.
Setting up a development environment: Configure a development environment that mirrors your production environment. This ensures that code behaves consistently across different stages of development.
Best practices for code management: Follow best practices, such as writing clean, modular code, using meaningful commit messages, and conducting code reviews. Implement coding standards and guidelines to ensure consistency and maintainability.

Agile development practices promote flexibility, collaboration, and continuous improvement.
Overview of Agile methodology: Agile is an iterative approach to development that emphasises collaboration, customer feedback, and small, incremental changes. It allows teams to respond quickly to changes and deliver value to users more frequently.
Benefits of iterative development: Iterative development allows you to deliver small, functional pieces of the project quickly. This enables you to gather feedback and make improvements throughout the development process. It also reduces the risk of large-scale failures and ensures the project stays aligned with user needs.
Conducting regular sprints and reviews: Divide the project into sprints, which are short, time-boxed periods of development. Conduct regular reviews to assess progress, gather feedback, and plan the next sprint. Use tools like Jira or Trello to manage and track tasks.
Thorough testing and quality assurance are essential to ensure your website functions correctly and meets user expectations.
Types of testing: Perform various types of testing, including unit testing, integration testing, system testing, and user acceptance testing. Each type of testing serves a different purpose and helps identify various issues. For example, unit testing checks individual components, while system testing evaluates the entire application.
Importance of automated testing: Automated testing can save time and improve accuracy by running tests automatically. This is especially useful for repetitive tasks and large codebases.
Bug tracking and resolution: Use bug tracking tools to document and prioritise issues. Assign team members to resolve bugs and verify that the fixes are effective. Tools like Jira, Bugzilla, or Trello can help you manage and track bugs efficiently.
Preparing for deployment involves setting up the necessary infrastructure and ensuring your website is ready for launch.
Setting up staging and production environments: Create a staging environment that mirrors your production environment. This allows you to test changes before deploying them to production. Ensure the staging environment is isolated from production to prevent accidental changes.
Deployment strategies: Choose a deployment strategy that reduces downtime and risk. Blue-green deployment, for example, involves running two identical environments and switching traffic between them. This allows you to deploy updates with minimal disruption to users.
Ensuring a smooth transition to production: Plan the deployment process carefully to avoid disruptions. Communicate with stakeholders and provide support during the transition.
Launching your website is an exciting milestone, but it is crucial to ensure everything is in place for a smooth launch and ongoing performance monitoring.
Final pre-launch checklist: Conduct a thorough review of your pre-launch checklist before launching. This includes testing all functionalities, checking for broken links, verifying that all content is accurate and up-to-date, and ensuring that the website is optimised for different devices and browsers. Make sure that all SEO elements, such as meta tags, alt texts, and keywords, are properly implemented.
Monitoring website performance and user feedback: Once the website is live, use analytics tools like Google Analytics to monitor its performance. Track key metrics such as page load times, bounce rates, user engagement, and conversion rates. Set up alerts for any significant drops in performance. Additionally, user feedback can be gathered through surveys, feedback forms, and social media to pinpoint areas for improvement.
Handling post-launch issues: Be prepared to address any issues that arise after the launch. This may include fixing bugs, optimising performance, and updating content. Establish a support system to handle user inquiries and technical issues quickly. Regularly review and analyse performance data to make informed decisions about future updates and improvements.